DOM-manipulations
DOM Manipulations#
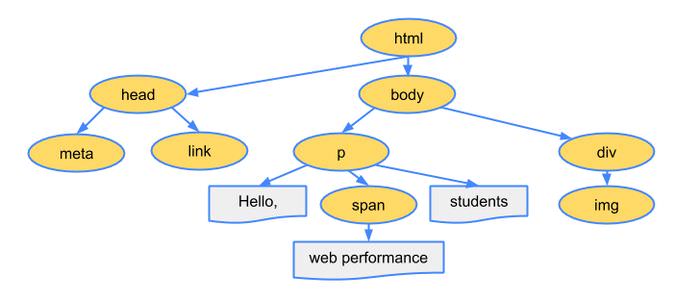
As a web developer, you frequently need to manipulate the DOM, the object model that is used by browsers to specify the logical structure of web pages, and based on this structure to render HTML elements on the screen.
HTML defines the default DOM structure. However in many cases you may want to manipulate this with JavaScript, usually in order to add extra functionalities to a site.
JavaScript Methods For DOM Manipulation#
There are many JavaScript methods that aid DOM manipulation. You’d likely use these methods frequently in your code
1- querySelector()#
The querySelector() method returns the first element that matches one or more CSS selectors. If no match is found, it returns null.
Before querySelector() was introduced, developers widely used the getElementById() method which fetches an element with a specified id value.
Although getElementById() is still a useful method, but with the newer querySelector() and querySelectorAll() methods we are free to target elements based on any CSS selector, thus we have more flexibility.
Syntax#
element– First matching element ornull(if no element matches the selectors).selector– one or more CSS selectors, such as"#fooId",".fooClassName",".class1.class2", or".class1, .class2".
Code Example#
In this example, the first <div> gets selected with the querySelector() method and its color is changed to red.
HTML#
Javascript#
2- querySelectorAll()#
Unlike querySelector() that returns only the first instance of all matching elements, querySelectorAll() returns all elements that match the specified CSS selector.
The matching elements are returned as a NodeList object that will be an empty object if no matching elements are found.
Syntax#
elements– ANodeListobject with all matching elements as property values.selector– one or more CSS selectors, such as"#fooId",".fooClassName",".class1.class2", or".class1, .class2".
Code Example#
The example below uses the same HTML as the previous one. However, in this example, all paragraphs are selected with querySelectorAll(), and are colored blue.
HTML#
Javascript#
3- addEventListener()#
Events refer to what happens to an HTML element, such as clicking, focusing, or loading, to which we can react with JavaScript. We can assign JS functions to listen for these events in elements and do something when the event had occurred.
- There are three ways you can assign a function to a certain event.
If foo() is a custom function, you can register it as a click event listener (call it when the button element is clicked) in three ways:
1- HTML
2- Javascript - first way
3- Javascript - second way
The method addEventListener() (the third solution) has some pros ; it is the latest standard – allowing the assignment of more than one function as event listeners to one event – and comes with a useful set of options.
Syntax#
element– The HTML element the event listener will be listening for.event– The targeted event.listener– Typically, a JavaScript function.options– (optional) An object with a set of boolean properties (listed below).
| Options | What happens, when it is set to true? |
|---|---|
capture | Stops event bubbling, i.e. prevents calling of any event listeners for the same event type in the element’s ancestors. To use this feature, you can use 2 syntaxes: element.addEventListener(event, listener, true); element.addEventListener(event, listener, {capture:true}); |
once | Listener is called only the first time the event happens, then it is automatically detached from the event, and won’t be triggered by it anymore. |
passive | The default action of the event cannot be stopped with the preventDefault() method. |
Code Example#
HTML#
Javascript#
4- createElement()#
The createElement() method creates a new HTML element using the name of the HTML tag to be created, such as 'p' or 'div'.
You can later add this element to the web page by using different methods for DOM insertion, such as AppendChild() see later in this session.
Syntax#
tagName– The name of the HTML tag you want to create.
Code Example#
With the following example, you can create a new paragraph element:
5- appendChild()#
The appendChild() method adds an element as the last child to the HTML element that invokes this method.
The child to be inserted can be either a newly created element, or an already existing one. In the latter case, it will be moved from its previous position to the position of the last child.
Syntax#
element– The HTML element to whichchildElementis added as its last child.childElement– The HTML element added as the last child ofelement.
Code Example#
In this example, we insert a <strong> element is as the child of a <div> element using the appendChild() and the aforementioned createElement() methods.
HTML#
Javascript#
6- setAttribute()#
The setAttribute() method either adds a new attribute to an HTML element, or updates the value of an attribute that already exists.
Syntax#
element– The HTML element to which an attribute is added, or of which attribute is updated.name– The name of the attribute.value– The value of the attribute.
Code Example#
In this example, we add the contenteditable attribute to a <div> by making use of the setAttribute() method, which will turn its content editable.
HTML#
Javascript#
7- getAttribute()#
The getAttribute() method returns the value of a specified attribute belonging to a certain HTML element.
Syntax#
element– The HTML element of which attribute is requested.name– The name of the attribute.
Code Example#
In this example, we alert the value of the contenteditable attribute belonging to the <div> element with the help of the getAttribute() method.
HTML#
Javascript#
8- removeAttribute()#
The removeAttribute() method removes a given attribute of a specific HTML element.
Syntax#
element– The HTML element of which attribute is to be removed.name– The name of the attribute.
Code Example#
In this example, we remove the contenteditable attribute from the <div> element. As a result, the <div> won’t be editable any more.
HTML#
JavaScript#
Adding CSS styles#
CSS rules can be applied like any other property; note though that the properties are camel-cased in JavaScript:
If we want certain values, we can obtain these via the .style property. However, this will only give us styles that have been explicitly applied. To get the computed values, we can use, window.getComputedStyle(). It takes the element and returns a CSSStyleDeclaration containing all styles from the element itself as well as those inherited from its parents:
Element properties#
Every element also has the properties .innerHTML and .textContent (as well as .innerText , which is similar to .textContent, but has some important differences ). These hold the HTML and plain text content respectively. They are writable properties, meaning we can modify elements and their contents directly:
Appending markup to the HTML, as shown above, is usually a bad idea though, as we’d lose any previously made property changes on the affected elements and bound event listeners. Setting the .innerHTML is good for completely throwing away markup and replacing it with something else, e.g. server-rendered markup. So appending elements would better be done like so:
Difference between using createTextNode with appendChild vs textContent:
If you have a span and you want to change its text , what do you think is better to use ?
1- createTextNode with appendChild
2- textContent
The fundamental difference is that:
createTextNode()is a method and works just as its name says: it creates an element then you must do something with it (like in your example, where you append it as a child); so it is useful if you want to have a new element and place it somewhere.textContentis a property you may get or set, with a unique statement and nothing else; so it is useful when you only want to change the content of an already existing element.
Now in this case, you want to change the text of the element:
So if your span looks like this
and you used createTextNode then it will end with:
because you appended your textNode.
So you should use textContent in this case.